
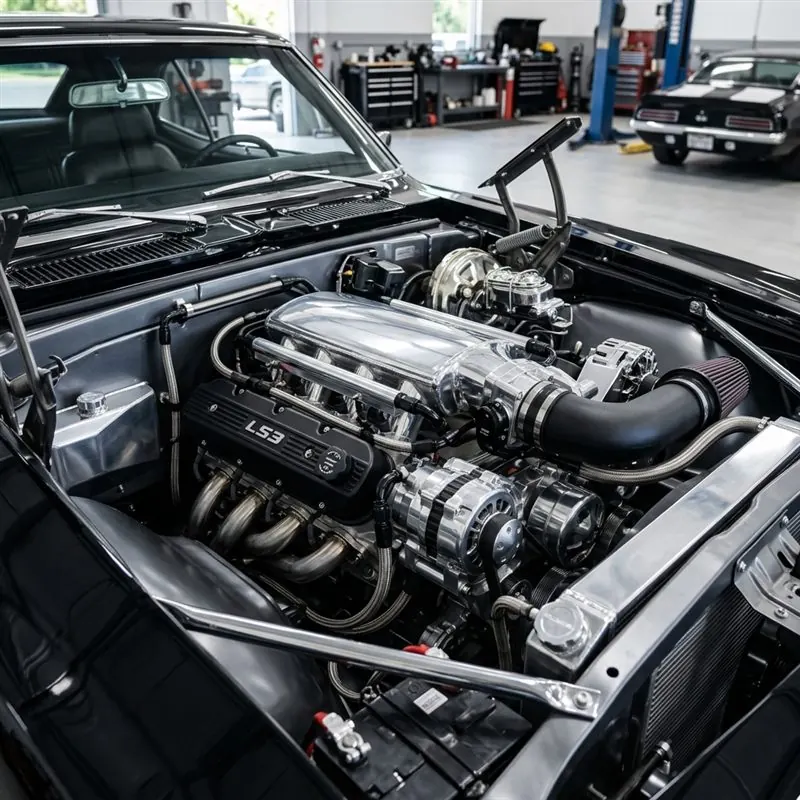
Swapping a modern General Motors LS engine into a vintage muscle car or street rod is the single most reliable performance upgrade you can make to a classic vehicle. Whether you are aiming to transform a 1969 Chevrolet Camaro SS into a 500-horsepower Pro-Touring machine, or dropping an engine into a 1932 Ford Deuce Coupe, an LS swap delivers modern fuel injection, turn-key reliability, 20+ MPG highway efficiency, and raw horsepower that old carbureted small-blocks simply cannot match.
At Carolina Street Rods, our master fabricators have completed hundreds of turnkey LS swap engine services across North Carolina and Florida. But while LS swaps are popular, cutting corners on motor mount positioning, fuel pressure delivery, wiring harness routing, or cooling capacity can quickly stall a garage project. This comprehensive technical guide breaks down every single subsystem node in the LS swap knowledge graph — giving you the exact part numbers, clearance specs, and mechanical steps required to get your build running smoothly.
- 1. Choosing the Right LS Engine (LS3 vs 5.3L vs LS1)
- 2. Motor Mounts & Chassis Fitment Guide
- 3. Holley EFI & Standalone Wiring Harness Setup
- 4. 58 PSI EFI Fuel System & Tank Requirements
- 5. Transmission Pairing (T56 Magnum vs 4L60E)
- 6. 2026 US Shop Labor & Parts Cost Breakdown
- 7. Frequently Asked Questions
1. The LS Engine Family Graph: Choosing the Right Block
The first decision node in your swap plan is selecting between Gen III and Gen IV LS platforms, as well as choosing an aluminum car block versus an iron truck block.
- Gen III (1997–2007) — 4.8L, 5.3L (LM7), 5.7L (LS1/LS6), 6.0L (LQ4/LQ9): 24x crankshaft reluctor wheel architecture. Best choice for budget builders. Iron block 5.3L LM7 engines are abundant in salvage yards and handle boost exceptionally well.
- Gen IV (2005–2017) — 5.3L (LY5/LMG), 6.0L (LY6), 6.2L (LS3/L99), 6.2L Supercharged (LSA): 58x reluctor wheel architecture with drive-by-wire throttle bodies and rectagular-port heads. The 430 HP naturally aspirated LS3 is the gold standard for high-end restomod builds and street rods for sale.
💡 Master Builder Tip: Front-End Weight Savings
An aluminum LS block (LS1, LS2, LS3) weighs approximately 415 lbs assembled — shedding 80 to 90 lbs directly off the front axle compared to an iron Gen I SBC 350. This drastically sharpens turn-in response on pro-touring suspension setups.
2. Motor Mounts, Subframe Spacing & Oil Pan Selection
Unlike old small-block Chevy engines, LS blocks use a 4-bolt motor mount pattern located further forward on the crankcase. To bolt an LS block onto vintage frame pads, you must use Billet Aluminum Conversion Adapter Plates.
Positioning Options:
- Standard Location Plates: Retains original bellhousing position. May cause clearance issues between the LS passenger cylinder head and the firewall.
- 1-Inch Setback Plates: Moves the engine 1 inch forward toward the radiator. Gives ample firewall clearance for high-rise LS3 intake manifolds and heater hose fittings.
- Adjustable Sliding Mounts (e.g., Dirty Dingo / ICT Billet): Allows up to 2 inches of fore-and-aft adjustment to clear steering boxes and custom crossmembers.
The Oil Pan Ground Clearance Problem:
Factory truck oil pans (LM7/LQ4) hang down nearly 3 inches below the front crossmember. Driving a lowered street rod or pro-touring classic with a stock truck pan will eventually result in a cracked sump. Always upgrade to a retro-fit cast aluminum swap pan such as the Holley 302-2 or 302-3 Muscle Car Oil Pan. These provide maximum steering rack clearance and sit flush above the crossmember floor.
3. Transmission Pairings: Manual T56 vs Automatic 4L60E/4L80E
Connecting your LS engine to the rear axle requires matching the gearbox to your driving goals and transmission tunnel dimensions.
| Transmission | Type | Torque Limit | Tunnel Modification Required |
|---|---|---|---|
| Tremec T56 Magnum | 6-Speed Manual | 700 lb-ft | High (Requires cutting sheet metal tunnel) |
| GM 4L60E / 4L65E | 4-Speed Auto Overdrive | 380 - 450 lb-ft | Minimal (Fits most 1960s GM A-Body / F-Body) |
| GM 4L80E | Heavy-Duty 4-Speed Auto | 650+ lb-ft | Moderate (Requires case ear trimming) |
| Tremec TKX | 5-Speed Manual | 600 lb-ft | Zero (Slim case designed for vintage tunnels) |
When running a Tremec T56 6-speed behind a 500HP LS3 in a 1969 Camaro or Tri-Five Chevy, ensure you use a heavy-duty 26-spline clutch disc and hydraulic throwout bearing kit. Measure your driveshaft working angle to stay between 1.5° and 3° to eliminate high-speed drivetrain vibration.
4. Fuel Delivery & Plumbing: 58 PSI High-Pressure Setup
Old mechanical fuel pumps outputting 5 to 7 PSI will not power an LS engine. LS Electronic Fuel Injection requires a constant 58 PSI (4 bar) regulated fuel supply.
The Recommended In-Tank Fuel Setup:
Avoid cheap external inline pumps mounted on the frame rail — they run loud, overheat, and suffer from fuel cavitation during hard cornering. Instead, install a custom fuel-injection gas tank (e.g., Tanks Inc. or Rick's Tanks) equipped with an internal 255 LPH or 400 LPH Walbro fuel pump and internal baffle tray.
Plumbing with the C5 Corvette Filter/Regulator:
The cleanest fuel plumbing solution uses a 1999–2004 C5 Corvette Fuel Filter/Regulator (WIX 33737 / GM 10299146). Mount this unit near the rear fuel tank. Run a short return line back to the tank, and a single 3/8-inch AN-6 hardline forward to the engine fuel rail. Use PTFE-lined braided hoses to prevent raw gasoline vapor smell in your garage.
5. Cooling System & Exhaust Header Clearance
LS engines operate efficiently at 195°F to 210°F. However, small vintage radiator cores cannot handle heat dissipation during summer traffic.
- Aluminum Dual-Pass Radiator: Install a crossflow aluminum radiator with inlet/outlet ports on the passenger side (LS water pump configuration).
- Electric Fan CFM Requirement: Dual 12-inch SPAL electric fans pulling minimum 3,000 CFM connected to a 40-amp relay harness.
- Steam Port Venting (CRITICAL): The LS cylinder heads feature steam bleeds at the top four corners. Plumb the steam port line back into the upper radiator hose adapter or top radiator tank. Never plug the steam ports — trapped air pockets will hot-spot the heads and blow head gaskets.
Exhaust Headers:
Cast iron factory exhaust manifolds (especially LS3 Camaro manifolds) rarely clear vintage steering shafts or frame rails. Install 1-3/4 inch stainless steel swap headers (e.g., Hooker Blackheart or Ultimate Headers) engineered specifically for your chassis.
6. Wiring Harness, Standalone ECU & Throttle Setup
Wiring scares many builders, but standalone LS engine control systems have made the electrical installation practically plug-and-play.
Factory Reworked vs Aftermarket Standalone (Holley Terminator X):
While you can modify a junkyard 5.3L harness by removing VATS (Vehicle Anti-Theft System) and rear O2 sensors, aftermarket systems like the Holley Terminator X / Terminator X MAX are vastly superior. They provide self-learning fuel maps, built-in transmission control for 4L60E/4L80E, hand-held touchscreens, and auto-tuning capabilities right out of the box.
The 4-Wire Hookup Rule:
A quality standalone LS engine harness only requires four main power feeds to run:
- Switched +12V Ignition: Hot in Start and Run key positions.
- Constant +12V Battery: Direct fused battery feed.
- Chassis & Engine Ground: Heavy gauge ground strap to cylinder heads and frame.
- Fuel Pump +12V Output: Triggers the in-tank fuel pump relay.
7. Gauge Integration & Interior Modernization
Connecting vintage mechanical gauges to metric LS engine sensors requires adapter fittings:
- Coolant Temperature Senders: M12x1.5 male to 3/8-inch NPT female adapter on the rear passenger head.
- Oil Pressure Senders: M16x1.5 male to 1/8-inch NPT female adapter on the top rear engine block valley cover.
- Digital Instrument Clusters: Upgrade to a Dakota Digital RTX or VHX instrument cluster. These connect via CAN-bus cable directly to your Holley or GM ECU — displaying speed, RPM, oil pressure, temp, voltage, and check engine lights with factory fitment.
8. Full Real-World Garage Budget Breakdown
Here is an itemized cost estimate comparing a DIY Budget 5.3L Swap against a Premium Turn-Key 500HP LS3 Pro-Touring Restomod Build:
| Component Category | DIY Budget 5.3L Swap | Pro-Touring LS3 Restomod |
|---|---|---|
| Engine Assembly | $1,200 (Junkyard 5.3L LM7) | $8,500 (New GM LS3 Crate Engine) |
| Transmission & Clutch | $800 (Used 4L60E) | $4,200 (Tremec T56 Magnum 6-Speed) |
| Motor Mounts & Swap Pan | $350 (Adapter plates + Holley pan) | $650 (Holley 302-3 + Billet mounts) |
| Fuel System (Tank/Pump/Lines) | $450 (Corvette filter + inline pump) | $1,200 (Tanks Inc EFI tank + PTFE lines) |
| Wiring Harness & ECU | $600 (Reworked factory harness) | $1,450 (Holley Terminator X MAX) |
| Cooling & Exhaust Headers | $550 (Aluminum rad + cast manifolds) | $1,800 (Dual pass rad + Stainless headers) |
| Gauges & Interior Integration | $150 (Sensor adapters) | $1,350 (Dakota Digital RTX Gauges) |
| ESTIMATED TOTAL COST | $4,100 - $5,200 | $20,150 - $22,500 |
9. Pre-First Start Checklist & Dyno Tuning
Before turning the key on your newly swapped LS classic, complete this final safety protocol:
- Oil Pressure Prime: Disconnect the ignition coils and crank the engine in 10-second bursts until oil pressure registers on your gauge (minimum 25 PSI cranking).
- Fuel Pressure Verification: Cycle the key to prime the fuel pump. Verify 58 PSI at the fuel rail test port. Check all AN fittings for leaks.
- Coolant Air Bleed: Fill the radiator with a 50/50 mix. Ensure the steam vent line is open and burp the cooling system as the engine reaches 195°F thermostat opening temp.
- Final Chassis Dyno Tune: Schedule a professional chassis dyno session to calibrate air-fuel ratios, timing curves, and transmission shift points.
Want a Turn-Key LS Swap Built by Professionals?
Building a custom street rod or pro-touring classic requires precise metal fabrication, wiring, and chassis engineering. If you prefer a turn-key build completed to museum-quality standards, the custom hot rod builders at Carolina Street Rods are here to turn your vision into reality. Browse our hot rods for sale inventory or get a custom build quote.
📚 Related Articles You Should Read
- Coyote V8 vs LS Swap: Which Engine is Better for Your Classic Car? — Can't decide between Ford and GM power? Our head-to-head comparison covers physical dimensions, power curves, shock tower fitment, and turn-key costs.
- How Much Does a Custom Street Rod Build Cost in 2026? — Get a transparent, itemized financial breakdown of LS swap builds from budget $4,100 DIY projects to $250,000 show cars.
- Digital Dash Installation Guide for Classic Cars — Pair your new LS swap with Dakota Digital RTX gauges using CAN-bus integration for seamless instrument accuracy.
❓ Frequently Asked Questions About LS Swaps
How much does an LS swap cost for a classic car?
A budget LS swap using a junkyard 5.3L truck engine can cost $4,000 to $6,000 for parts alone if you do the labor yourself. A mid-range LS3 swap with a Holley Terminator X standalone harness, motor mounts, and complete cooling system typically runs $8,000 to $14,000 in parts. Professional turn-key installations at a qualified shop add $5,000 to $15,000+ in labor depending on the fabrication complexity of your specific vehicle.
Which LS engine is best for a first-time swap?
The LS3 (6.2L) from the 2010-2015 Camaro SS is widely regarded as the best all-around choice. It delivers 430 HP naturally aspirated, uses standard Gen IV accessories, and has the widest aftermarket support from companies like Holley, Speedway Motors, and Hedman. For a budget build, the 5.3L truck engine (LM7/LC9) offers the lowest entry cost with proven boost capability up to 700+ HP.
Will an LS engine fit in my classic car without cutting the firewall?
In most pre-1972 GM vehicles (Camaro, Chevelle, Nova, C10), the LS drops in with bolt-on swap kits and zero firewall modification. Ford Mustangs and Mopar vehicles often require minor transmission tunnel widening and custom motor mount plates. The key is choosing the correct oil pan configuration — a Holley or Sikky retrofit oil pan clears most factory K-members and steering components without cutting sheet metal.
What transmission pairs best with an LS swap?
For manual, the Tremec T56 Magnum 6-speed is the gold standard — it handles 700 lb-ft of torque and bolts directly to all Gen III/IV LS bellhousing patterns. For automatic, the 4L60E handles up to 450 HP, while the 4L80E manages 600+ HP. The modern ZF 8HP70 8-speed is gaining popularity in 2026 for its smooth highway cruising and improved fuel economy.
Do I need to upgrade my fuel system for an LS swap?
Yes, absolutely. Old mechanical fuel pumps deliver 5-7 PSI, but LS electronic fuel injection requires a constant 58 PSI (4 bar) supply. You need an EFI-compatible fuel tank with an internal high-pressure pump (255 LPH minimum) and 3/8-inch supply lines with AN fittings. Companies like Tanks Inc. and Aeromotive make bolt-in replacement tanks specifically designed for classic car LS swap applications.
How long does a professional LS swap take?
A straightforward bolt-in LS swap on a common GM platform (1967-1969 Camaro, 1964-1972 Chevelle) typically takes a professional shop 80 to 120 labor hours. Custom fabrication-heavy installs (Ford, Mopar, or non-standard chassis) can take 150 to 250+ hours. At Carolina Street Rods, most turn-key LS swap projects are completed in 6 to 10 weeks from engine delivery to dyno testing and road tuning.
Written by the Carolina Street Rods Engine Shop
25+ Years of LS Swap & Classic Car Engine Experience
This guide was authored by the master engine builders at Carolina Street Rods in Charlotte, NC. Our team has completed 200+ LS engine swaps across Camaros, Chevelles, Mustangs, C10 pickups, and custom street rods since 1999. Every technical specification, part number, and torque value in this article comes from real shop floor experience — not internet research. For a professional LS swap consultation, contact our engine shop.